


Lesson 596
Dzifa
This lesson was written on July 21, 2024 with psp12
If you are working with a different version of PSP, the settings and filter effects may give a different effect. Play around with the settings until you get the desired result.
This lesson was conceived and written by me. Any similarity is purely coincidental.
In my lessons I use a color scheme
I list the colors by noting the color number in the color box, in the color scheme
The main tube
of myself
Other materials are made by myself, this will have mpd© behind it
This lesson contains 45 steps
Supplies
Tube(s)
MPL Watermark
Color Scheme L596 mpd©
Fantasy woman AI Generated by mpd©
L596 Deco made by mpd©
Plugin(s)
Toadies – Blast 'Em
Fm Tile Tools – Blend emboss
Graphic Plus – Cross Shadow
Unlimited 2.0
(&Bkg Designers sf10 IV – SW Hollow Dot)
Selection(s)
L596 Sel 1 mpd©designs
L596 Sel 2 mpd©designs
L596 Sel 3 mpd©designs
L596 Sel 4 mpd©designs
L596 Sel 5 mpd©designs
L596 Sel 6 mpd©designs
Click on the logo below to download the materials
Preparation
Put the selections in the selections folder of my psp files/My psp files
Open the tubes/makers and the color scheme in your psp. Minimize them,
except for the color scheme.
Set your foreground to color nr 1
1.
File - Open a new transparent image 800x500 pixels
Selections / Select All
2.
Activate Fantasy woman AI Generated by mpd©
Edit-Copy and return to your 800 image
Edit / paste into selection
Selections- Select None
3.
Effects / Image Effects / Seamless Tiling using the default settings
but transition at 100
4.
Adjust / Blur / Gaussian Blur-Radius 20,00%
Effects / Plugins / toadies – Blast 'Em;
Diffuse at 10
Transparency at 211
5.
Effects / Plugins / Fm tile tools – blend emboss, default settings
Selections / load-save selection / load selection from disk and in the drop-down menu look for
L596 Sel 1 mpd©designs
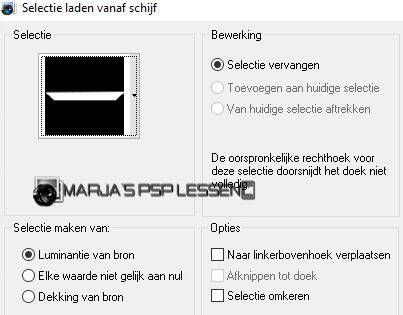
6.
Layers/ New raster layer
Flood Fill Tool-Fill the selection with ( color n0 1)
Selections- Select None
Effects / Plugins / graphic plus – cross shadow, using the default settings
7.
Selections / Select All
Selections / Float
Selections / Defloat
Selections / Modify / contract 2 pixels
and hit your delete key once..
Set your foreground to color n0 2
and your background to color n0 3
8.
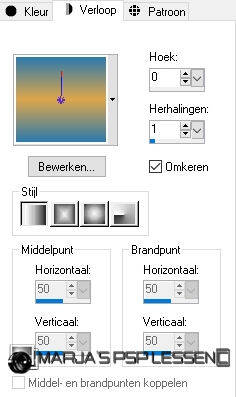
Set your background color into a Background/Foreground gradient - style Lineair
Angle 0
Repeats 1
Invert checked
9.
Layers / New raster layer
Flood Fill Tool-Fill the selection with the gradient
Selections-Select None
10.
Layers / Arange / Move down
Activate the top of the layers palette
Effects / 3D-Effects/ Drop Shadow
v&h at 1
Opacity 50
Blur 1,00 color black
11.
Layers / Merge / Merge Down
Layers / Duplicate
Image/Mirror/Mirror vertical(Image/Flip in older versions of PSP)
Layers / Merge / Merge Down
12.
Set your foreground to color no1
remove the gradient from your background so that it becomes your solid color
Selections / load-save selection / load selection from disk and in the drop-down menu look for :
L596 Sel 2 mpd©designs
Settings are still correct
13.
Layers / New raster layer
Flood Fill Tool-Fill the selection with the foreground color (color n0 1)
Selections-Select None
Effects / Plugins / graphic plus – cross shadow, using the default settings
Selections / Select All
Selections / Float
Selections / Defloat
14.
Selections / Modify / Contract with 2 pixels
and hit your delete key once..
Layers / New raster layer
Flood Fill Tool-Fill the selection with the background color (color n0 3)
15.
Selections / Modify / Contract with 10 pixels
Selections/Modify/Select Selection Borders
Inside and anti-alias checked
Border width at 4
16.
Set your foreground to color n0 2
Layers / New raster layer
Flood Fill Tool-Fill the selection with the foreground color
Selections-Select None
17.
Effects / Image Effects/ Offset
horizontal at 0
vertical at 15
Custom and transparent checked
18.
Layers / Merge / Merge Down
Layers / Arange / Move down
Activate the top of the layers palette
Effects / 3D-Effects/ Drop Shadow
v&h at 1
Opacity 50
Blur 1,00 color black
19.
Layers / Merge / Merge Down
Selections / load-save selection / load selection from disk and in the drop-down menu look for :
L596 Sel 3 mpd©designs
Settings are still correct
20.
Set your foreground to color n0 1
Layers / New raster layer
Flood Fill Tool-Fill the selection with the foreground color
Selections-Select None
Effects / Plugins / graphic plus – cross shadow, using the default settings
Selections / Select All
Selections / Float
Selections / Defloat
21.
Selections / Modify / Contract with 20 pixels
and hit your delete key once
Set your foreground to color n0 2
Background is on color n0 3
22.
Put your background back on the gradient
(see step 8)
Layers / New raster layer
Flood Fill Tool-Fill the selection with the gradient
23.
Effects / Plugins / Unlimited 2.0 / &Bkg Designers sf10 IV – SW Hollow Dot
Selections-Select None
Layers / Arange / Move down
Activate the top of the layers palette
24.
Layers / Merge / Merge Down
Repeat this one more time
Layers / Duplicate
Image/Mirror/Mirror vertical(Image/Flip in older versions of PSP)
Layers / Merge / Merge Down
25.
Set your foreground to color no 1
Remove the gradient from your background so that it becomes your solid color
Selections / load-save selection / load selection from disk and in the drop-down menu look for :
L596 Sel 4 mpd©designs
Settings are still correct
26.
Layers / New raster layer
Flood Fill Tool-Fill the selection with the foreground color
Selections-Select None
Effects / Plugins / graphic plus – cross shadow, using the default settings
Selections / Select All
Selections / Float
Selections / Defloat
27.
Selections / Modify / Contract with 2 pixels
and hit your delete key once.
Layers / New raster layer
Flood Fill Tool-Fill the selection with the background color (color no 3)
28.
Selections / Modify / Contract with 10 pixels
Selections/Modify/Select Selection Borders
Inside and anti-alias checked
Border width at 4
29.
Set your foreground to color n0 2
Layers / New raster layer
Flood Fill Tool-Fill the selection with the foreground color
30.
Selections-Select None
Effects / Image Effects/ Offset
horizontal at min 15
vertical at 0
Custom and transparent checked
31.
Layers / Merge / Merge Down
Layers / Arange / Move down
Activate the top of the layers palette
Effects / 3D-Effects/ Drop Shadow
v&h at 1
Opacity 50
Blur 1,00 color black
32.
Layers / Merge / Merge Down
Selections / load-save selection / load selection from disk and in the drop-down menu look for :
L596 Sel 5 mpd©designs
Settings are still correct
33.
Set your foreground to color no 1
Layers / New raster layer
Flood Fill Tool-Fill the selection with the foreground color
34.
Selections-Select None
Effects / Plugins / graphic plus – cross shadow, using the default settings
Selections / Select All
Selections / Float
Selections / Defloat
Selections / Modify / Contract with 20 pixels
and hit your delete key once
Set your foreground to color no 2
Background is on color no 3
35.
Put your background back on the gradient
(see step 8)
Layers / New raster layer
Flood Fill Tool-Fill the selection with the gradient
36.
Effects /Plugins/ Unlimited 2.0 / &Bkg Designers sf10 IV – SW Hollow Dot
Selections-Select None
Layers / Arange / Move down
Activate the top of the layers palette
37.
Layers / Merge / Merge Down
Repeat this one more time
Layers / Duplicate
Image/Mirror/Mirror Horizontal (Image/Mirror in older versions of PSP)
Layers / Merge / Merge Down
38.
Selections / load-save selection / load selection from disk and in the drop-down menu look for :
L596 Sel 6 mpd©designs
Settings are still correct
39.
Layers / New raster layer
Activate the tube Fantasy Woman AI Generated by mpd©
Edit-Copy and return to your 800 image
Edit / paste into selection
40.
Selections- Select None
Layers / arrange / move down
Repeat 2x more
Activate the top of the layers palette
41.
Activate the tube L596 Deco made by mpd©
Edit-Copy and return to your 800 image
Edit - Paste as new layer
Do not move, it is in the right place
42.
Set your foreground to color n0 1
Layers / Merge / Merge All
43.
Image - Add Borders-Symmetric checked:
1 pixel foreground color
40 pixels color black
1 pixel foreground color
44.
Image / Resize 800 pixels width
Resize all layers checked
Activate L596 text made by mpd©
Edit-Copy and return to your 800 image
Edit - Paste as new layer
45.
Place the text at the bottom right, or wherever you like it
Layers / New raster layer
and put your name/watermark on it
!! Don't forget my watermark !!!
Layers / Merge / Merge All
Save your work as a jpeg file
This brings you to the end of this lesson.
I hope you found it a fun/enjoyable lesson.
Would you like your elaboration on my site?
You can do it! Send me an email and I'll post it for you.
Thanks for making my lesson
Image made by Marion

Maak jouw eigen website met JouwWeb