


Lesson 625
Ligth of Hope
This lesson was written on February 1, 2025 using psp12.
If you are using a different version of PSP, the settings and filter effects may have a different effect.
Play around with the settings until you get the result you want.
This lesson was conceived and written by me. Any similarities are purely coincidental.
I use a color scheme in my lessons
I list the colors by noting the color number in the color box, in the color scheme
Main tube is from
Masks are from
Narah and myself
Other materials are made by myself, this will have mpd© behind it.
This lesson contains 48 steps
Supplies
Tube(s)
MPL Watermerk
Renee-TUBES-Paysage16
L625 Deco by mpd©
L625 Deco 1 by mpd©
L625 floor by mpd©
L625 frame by mpd©
L625 corner by mpd©
L625 text 1 mpd© (deze is als png)
L625 text 2 mpd©
Plugin(s)
Noise Filters – Noisy Zoom*
Unlimited 2.0
Graphic Plus – Emboss
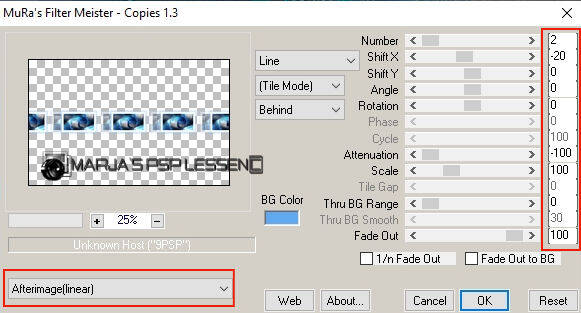
MuRa's Meister – copies
*Import this filter into Unlimited 2.0
Mask(s)
NarahsMask_1580
Narah_mask_0812
L625 masker bympd©
Click on the logo below to download the materials
Preparation
Place the selections in the selections folder of your psp files
Open the tubes and the color scheme in your PSP.
Minimize them except for the color scheme.
Set your foreground to white
1.
Open a new image of 800x500 pixels in black
Layers / New raster layer
Selections / Select All
2.
Activate Renee-TUBES-Paysage16
In your layer palette, activate the middle layer
Edit/copy and return to your 800 image
Edit / Paste into selection
Selections/ Select none
3.
Effects/Image Effects/Seamless Tiling/default
BUT transition at 100
Adjust / Blur / Radial blur

4.
Layers / Merge / Merge visible
Layers / Duplicate
5.
Effects / Plugins / Filters in Unlimited 2.0 / Noise Filters – Noisy Zoom, default
Zoom 41
Noise 27
6.
Effects /Plugins Graphic plus – Emboss
all sliders to 0
Change the blend mode of this layer to Overlay/
Reduce the opacity of this layer to 60
Layers / Merge / Merge visible
7.
Layers / New raster layer
Flood fill the layer with color white
Layers / New mask layer / From image and select mask:
Narah_mask_0812

8.
Layers / Merge / Merge group
Change the blend mode of this layer to Dodge
Effects / Edge Effects / Enhance More
9.
In your layer palette, close the middle and bottom layer
by clicking on the eye
The top layer remains activated
10.
Activate your Magic Wand / Tolerance at 0 and Feather at 0
click in the center of the circle
11.
Selections /Modify/ Expand by 4
You can reopen the middle and bottom layers
by clicking on the eye again
The top layer remains activated
12.
Activate Renee-TUBES-Paysage16
Activate the middle layer
Edit/copy and return to your 800 image
13.
Edit / Paste as a new layer
Image / Resize
2x with 85%
Both times/resize all layers not checked
14.
Effects / Image effects / Offset
Horizontal at 0
Vertical at 75
Custom and transparent checked
15.
Selections / Invert
Press your delete key once
Selections/select none
Change the blend mode of this layer to Soft Light
16.
Adjust / Sharpness/ Sharpen
Layers / Merge / Merge visible
17.
Layers / New raster layer
Flood fill the layer with color white
Layers / New mask layer / From image and select mask:
NarahsMask_1580
Settings are still correct
18.
Layers / Merge / Merge group
Change the blend mode of this layer to Overlay
19.
Activate L625 deco by mpd©
Edit / Copy and return to your 800 image
Edit / Paste as a new layer
20.
Effects / Image effects / Offset
Horizontal at 155
Vertical at 88
Custom and transparent checked
21.
Layers / New raster layer
Flood fill the layer with color white
Layers / New mask layer / From image and select mask:
L625 masker madebympd©
Settings are still correct
22.
Layers / Merge / Merge group
Effects / 3D- Effects / Drop shadow
v&h at 1
Opacity 85
Blur 1,00 black
Change the blend mode of this layer to Luminance (legacy)
Reduce the opacity of this layer to 70
23.
Activate L625 frame by mpd©
SHIFT + D we continue working on the copy
Close the original
24.
Activate your Magic Wand / Tolerance at 0 and Feather at 0,
Click with the wand in the center of the frame
Layers / New raster layer
25.
Return to your 800 image
In your layer palette, activate the bottom layer (merged layer)
Edit / Copy
And return to your frame
26.
Edit / Paste into selection
Adjust / Sharpness / Sharpen
Selections/select none
27.
Layers / Merge / Merge visible
Edit / Copy and return to your 800 image
28.
Activate the top layer in your layer palette
Edit / Paste as a new layer
Do not move !
29.
Layers / Duplicate
Effects /Plugins/ MuRa's Meister – copies

30
Layers / Arrange / Move down
Stay on this layer
31.
Effects / Plugins / MuRa's Meister – copies
32.
Activate the top layer in your layer palette
Layers /Merge / Merge down
33.
Effects / Image effects / Offset
Horizontal at 0
Vertical minus at 150
Custom and transparent checked
34.
Activate L625 floor by mpd©
Edit / Copy and return to your 800 image
Edit / Paste as a new layer
35.
Effects / Image effects / Offset
Horizontal at 0
Vertical minus at 225
Custom and transparent checked
36.
Activate L625 deco 1 by mpd©
Edit / Copy and return to your 800 image
Edit / Paste as a new layer
37.
Effects / Image effects / Offset
Horizontal at 0
Vertical minus at 200
Custom and transparent checked
38.
Layers / Merge / Merge all (flatten)
Set your background to #6fc8d4
39.
Image / Add borders
1 pixel -Background color
Selections / Select All
40.
Image / Add borders
40 pixels -color white
41.
Effects / 3D -Effects / Drop shadow
V&H at 0
Opacity 85
Blur 15,00 Color black
Selections/Select none
42.
Image / Resize 800 pixels width
Resize all layers checked
43.
Activate L625 corner by mpd©
Edit / Copy and return to your 800 image
Edit / Paste as a new layer
44.
Place the corner at the top left
Activate L625 text 1 mpd©
Edit / Copy and return to your 800 image
45.
Edit / Paste as a new layer
Move to the top left (see finished image)
or where you like it
46.
Activate L625 text 2 mpd©
Edit / Copy and return to your 800 image
Edit / Paste as a new layer
47.
Place this text in the middle of the bottom
or where you like it
48.
Layers / New raster layer
Add your name/watermark
!! Don't forget my watermark !!
Layers/Merge/Merge All ( flatten)
Save your work as a JPG file
This brings us to the end of this lesson.
I hope you enjoyed it.
Want your artwork on my site?
You can! Send me an email and I will put it up for you.
Thanks for making my lesson
Additional example made by Marion

Maak jouw eigen website met JouwWeb